자바스크립트 함수에 대한 설명


함수 종류는 3가지이다.

1. function declarations
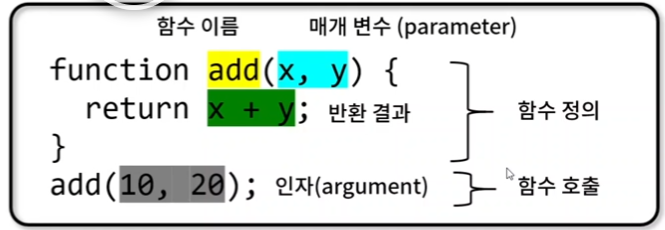
function add(x,y){
  return x+y;
}

2. function expressions

const calculation = function() {
}

 함수 표현식(2번)은 함수 선언식(1번) 대비 함수 중복 선언을 막아주는 중요한 유틸성이 있다.


3. function method

const calculation = {
	add: function(){
    }
}

4. arrow function

const add = (x,y) => x + y;

화살표 함수는 다른 함수와는 몇가지 부분이 다르다. 다른 함수방식과 비교시 가볍지만 argument가 없고, this의 작동 방식이 다르다고 한다.

'자바스크립트' 카테고리의 다른 글

Ternary operator(삼항연산자)  (0) 2022.06.15
앞으로 공부방법  (0) 2022.05.19
Object  (0) 2022.04.14
EventListener  (0) 2022.04.13
parseInt, string and number  (0) 2022.04.12

Object안에서의 룰은 밖에서와 다르다. ( =가 :로 바뀐다던지 등)

Object은 여러가지 property를 세팅하게해준다.

예를 들자면

const playerName = "백승헌"
const playerAge = "32"
const playerGender = "Male"

이렇게 해야할 것을, Object를 쓴다면

const player = {
    name : "백승헌",
    age : "32",
    gender : "male,
};

이렇게 깔끔하게 정리할 수 있다.

console.log(playerName) -> console.log(player.name) 이렇게해서 같은 값인 "32"를 불러올 수 있다.

관련 영상..

https://nomadcoders.co/javascript-for-beginners/lectures/2879

'자바스크립트' 카테고리의 다른 글

앞으로 공부방법  (0) 2022.05.19
function  (0) 2022.04.27
EventListener  (0) 2022.04.13
parseInt, string and number  (0) 2022.04.12
return  (0) 2022.04.12


console.dir(xxxx);
xxxx needs to be defined

위 명령어를 실행하면 directory가 console에 뜨는데, 여기서 on으로 시작하는것을 적용할 수 있다. Ex, onmouseenter같은경우 VSC에서는 on를 뺴고 title.addEventListener("mouseenter", )를 실행할 수 있다.


const title = document.querySelector(".hello h1");

function handleTitleClick() {
  title.style.color = "blue";
}

title.addEventListener("click", handleTitleClick);

위에 코드를 해석하자면, 

when somebody "clicks" on the title("which is .hello h1") then, run "handleTitleClick" function, which would turn the color to blue.

const h1 = document.querySelector(".hello h1");

function handleTitleClick() {
  if (h1.style.color === "blue") {
    h1.style.color = "tomato";
  } else {
    h1.style.color = "blue";
  }
}

h1.addEventListener("click", handleTitleClick);

위에 코드를 해석하자면, 

when somebody "clicks" on the h1 then, run "handleTitleClick" function.

"handleTitleClick" function should change the h1 color to blue if the color isn't blue, if it is blue then change the color to tomato upon clicking h1.


'자바스크립트' 카테고리의 다른 글

function  (0) 2022.04.27
Object  (0) 2022.04.14
parseInt, string and number  (0) 2022.04.12
return  (0) 2022.04.12
=== and =  (0) 2022.04.06
const age = parseInt(prompt("how old are you?"));

functions get executed from inside and out

"14" <--- string, 14 <---- number

parseInt changes strings to integers


<hr>

const age = parseInt(prompt("How old are you?"));

if (isNaN(age)) {
  console.log("Please write a number");
} else {
  console.log("Thank you for writing your age.")
}

위에 코드를 해석해보자.

1. 처음 prompt("How old are you?")에서 숫자나 글자를 넣으면, 그 다음 parseInt에서 string을 integer로 바꿔준다.

2. 밑에 if에서는 isNaN(is not a number)으로 해당 value가 숫자였는지(false), 숫자가 아니였는지(true)에 따라서 boolean으로 값을 말해준다.

3. 만약 false이면 "please write a number"가 콘솔에 프린트되고, true이면 "Thank you for writing your age."가 프린트된다.

'자바스크립트' 카테고리의 다른 글

Object  (0) 2022.04.14
EventListener  (0) 2022.04.13
return  (0) 2022.04.12
=== and =  (0) 2022.04.06
const, let and var  (0) 2022.04.01

function안에서 return과 추가작업을 입력하면,
return만 작업하고 추가 수행은 이뤄지지 않는다.
만약 return 앞에 기타작업이 있다면 이 작업은 수행된다.
즉, return"까지만" 수행된다!


TLDR; console.log는 그림의 떡. 꺼내 먹으려면 return이 필요하다.


'자바스크립트' 카테고리의 다른 글

EventListener  (0) 2022.04.13
parseInt, string and number  (0) 2022.04.12
=== and =  (0) 2022.04.06
const, let and var  (0) 2022.04.01
자바스트립트 첫날  (0) 2022.03.31
function handleTitleClick(){
    if(h1.style.color === "blue"){
        h1.style.color = "tomato";
    } else {
        h1.style.color = "blue";
    }
}

It says that if h1.style's color is blue, then change the color to tomato. If not blue, then change the color to blue. 

It would start by being black -> blue -> tomato -> blue -> tomato..

'자바스크립트' 카테고리의 다른 글

EventListener  (0) 2022.04.13
parseInt, string and number  (0) 2022.04.12
return  (0) 2022.04.12
const, let and var  (0) 2022.04.01
자바스트립트 첫날  (0) 2022.03.31
const a = 5;
const b = 2;
let myName = "nico";

console.log(a+b);
console.log(a*b);
console.log(a/b);
console.log("hello "+  myName);

myName = "nicholas";

console.log("your new name is" + myName);

const와 let의 차이는 둘다가 정의를 내리는데 쓰이는 명령어이지만, const는 바꿀수가 없고, let은 바꿀수 있다는 것에 차이가 있다. 위를 보면서 예시를 들면, my name을 다시 정의하는 문구인

myName = "nicholas";
는 만약 let이 아니라 const였다면 myName이 nicolas로 바뀌지 않고, 그대로 nicholas 였을 것이다. 


Var은 예전 JS에서 쓰이던 const와 let이 합쳐진 거라 보면된다. 다만 이제는 잘 안쓰이기에 내가 기억해야할 것은 

"Always const, sometimes let, never var."


'자바스크립트' 카테고리의 다른 글

EventListener  (0) 2022.04.13
parseInt, string and number  (0) 2022.04.12
return  (0) 2022.04.12
=== and =  (0) 2022.04.06
자바스트립트 첫날  (0) 2022.03.31

코로나 이후에 하루정도 코딩을 못했더니 도태하는 듯한 느낌을 받았다. 몸이 아프더라도, 조금은 보고 학습해야겠다는 생각이 들어서 다시 노마드코더를 틀었다.

const a = 5;
const b = 2;

console.log(a+b);
console.log(a*b);
console.log(a/b);

const myname = "nico";

variable을 설정하는 방법에 대해서 봤다.

const는 constant의 약자이고, 정의할 때 쓰는 명령어이다. 

숫자는 그냥 쓰면되고, 글자는 ""를 써서 정의해야한다.

'자바스크립트' 카테고리의 다른 글

EventListener  (0) 2022.04.13
parseInt, string and number  (0) 2022.04.12
return  (0) 2022.04.12
=== and =  (0) 2022.04.06
const, let and var  (0) 2022.04.01

+ Recent posts